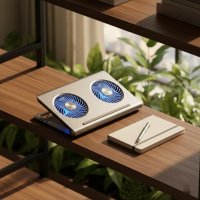
Is your laptop feeling hotter than a summer sidewalk? Do you hear the fans whirring relentlessly, struggling to keep up with your demands? We’ve all been there. Overheating isn’t just an annoyance; it can lead to frustrating performance drops, system instability, and even long-term damage to your beloved machine. While the market is flooded with commercial cooling solutions, sometimes the most satisfying and cost-effective fix comes from your own workshop – or, more accurately, your collection of household items. This guide will walk you through everything you need to know about designing and building an effective homemade laptop cooler that keeps your system frosty and your wallet happy.
Why Your Laptop Needs a Cooling Boost (And Why DIY Can Help)
Modern laptops pack a powerful punch into incredibly thin chassis. This compact design, while sleek, often leaves little room for robust cooling systems. When your laptop works hard – whether you’re gaming, video editing, or just browsing with too many tabs open – its internal components generate a lot of heat. If this heat isn’t dissipated efficiently, the system automatically “throttles” its performance, essentially slowing down to prevent damage. This means choppy frame rates, laggy applications, and a generally frustrating user experience. In extreme cases, prolonged overheating can shorten the lifespan of your battery, processor, and graphics card. For best laptop cooling roundups on this site.
This is where a little ingenuity with a homemade laptop cooler can make a huge difference. Building your own solution allows for customization to your specific laptop model and usage, often at a fraction of the cost of a store-bought pad. It’s a project that taps into basic physics to deliver real-world benefits.
Understanding the Principles of Effective Laptop Cooling
Before you grab your tools, it’s helpful to understand the core principles that make any laptop cooler, well, cool.
- Airflow is the Golden Rule: Laptops draw in cool air and exhaust hot air, typically through vents on the bottom, sides, or back. When you place a laptop directly on a flat surface like a desk or a bed, these vents can get blocked, trapping hot air inside. The primary goal of any cooler is to ensure unrestricted airflow under and around the laptop.
- Heat Dissipation through Convection: Convection is the transfer of heat through the movement of fluids (in this case, air). By increasing the movement of cooler air over the laptop’s hot surfaces and carrying away the warmer air, we enhance heat dissipation.
- Elevation for Success: Even a slight lift can dramatically improve airflow underneath your laptop. This simple act creates a larger volume of air that can move freely, preventing heat buildup.
Ready, Set, Build! Popular Homemade Laptop Cooler Designs
There are several approaches to creating a homemade laptop cooler, ranging from super simple to slightly more involved.
The Simple Stand: Elevation is Key
|
Our Picks for the Best Laptop Cooler in 2026
As an Amazon Associate I earn from qualifying purchases.
|
||
| Num | Product | Action |
|---|---|---|
| 1 | KeiBn Laptop Cooling Pad, Gaming Laptop Cooler 2 Fans for 10-15.6 Inch Laptops, 5 Height Stands, 2 USB Ports (S039) |

|
| 2 | llano V12 RGB Laptop Cooling Pad, Gaming Laptop Cooler with 5.5 Inch Powerful Turbofan, Fast Cooling Laptop 15.6-21in, Adjustable Speed, Touch Control, LCD Screen, Black (RGB) |
|
| 3 | havit HV-F2056 15.6\"-17\" Laptop Cooler Cooling Pad - Slim Portable USB Powered (3 Fans), Black/Blue |
|
| 4 | Laptop Cooling Pad, Laptop Cooler 6 Quiet Fans for 12\"-17\" Laptops, Gaming Laptop Fan Cooling Pad with 5 Height Adjustable, Slim Portable USB Powered, 2 USB Ports & Phone Holder |
|
| 5 | Kootek Laptop Cooling Pad, Laptop Cooler with 5 Quiet Fans for 12\"-17\" Computer PC Notebook Gaming Laptop Fan, Height Adjustable Laptop Cooling Stand Laptop Accessories, Blue |
|
| 6 | llano V12 Laptop Cooling Pad, Gaming Laptop Cooler Stand with 5.5inch Powerful Turbo Fan, Adjustable Speed, Touch Control, 3-Port USB A, for Fast Cooling Laptop 15.6-19in, Black (No RGB) |
|
| 7 | Laptop Cooling Pad, Gaming Laptop Cooler for 13-19 Inch Laptops, RGB Lights Laptop Fan Cooling Pad with 3 Height Adjustable and 3 USB Ports, 4.72 Inch Large Turbo Fan, Max 3500RPM |
|
| 8 | Razer Laptop Cooling Pad: Adaptive Smart - Intelligent Fan Control - Airtight Pressure Chamber - Fits Most Laptops & Macbooks 14” to 18\" - Preset & Custom Fan Curves - 3 Port USB Type A - Chroma RGB |
|
| 9 | ChillCore Laptop Cooling Pad, RGB Lights Laptop Cooler 9 Fans for 15.6-19.3 Inch Laptops, Gaming Laptop Fan Cooling Pad with 8 Height Stands, 2 USB Ports - A21 Blue |
|
| 10 | AICHESON Laptop Cooling Pad 5 Fans Up to 17.3 Inch Heavy Notebook Cooler, Blue LED Lights, 2 USB Ports, S035, Blue-5fans |
|
This is the easiest and most immediate way to improve your laptop’s cooling. The concept is straightforward: lift your laptop off the surface it’s resting on.
- Materials: Two books, a couple of bottle caps, small wooden blocks, or even sturdy erasers.
- How-to: Place your chosen items under the rear feet or edges of your laptop, creating a gap of at least an inch or two. Ensure the laptop is stable and won’t slide off.
- Benefits: Instantaneous, virtually free, and requires no tools. It immediately provides more breathing room for your laptop’s intake vents.
Fan-Powered Creations: Harnessing Airflow
If you want more active cooling, integrating a fan is the next logical step. This type of homemade laptop cooler can offer significant temperature drops.
- Materials:
- A USB fan (easily found online or salvaged from old gadgets).
- An old PC case fan (120mm or 80mm are common, but require a 12V power supply or a USB step-up converter).
- Sturdy material for the stand/casing: cardboard, thin plywood, strong plastic, or even LEGO bricks.
- A USB cable (if using a PC fan, you’ll need to cut and strip the wires to connect to a USB port).
- Zip ties, hot glue, or strong tape.
- How-to:
- Design the Base: Create a stable platform that elevates your laptop. This can be a simple flat surface with legs or a more elaborate box-like structure.
- Integrate the Fan: Cut a hole in your base material directly underneath where your laptop’s intake vents are located. Mount the fan so it blows air up towards the laptop. Ensure the fan is securely attached.
- Power Connection: If using a USB fan, simply plug it into an available USB port on your laptop or a wall adapter. For PC fans, you’ll need to connect the fan’s positive and negative wires to a USB cable’s corresponding wires. Always double-check polarity to avoid damage. A safer option for PC fans is an external 12V adapter.
- Enclosure (Optional but Recommended): Building a small enclosure around the fan can help direct the airflow more effectively towards the laptop, rather than letting it disperse in all directions.
- Safety Considerations: When dealing with electrical components, even low voltage USB, always exercise caution. Ensure all wire connections are insulated to prevent short circuits. Also, make sure your stand is stable and won’t easily tip over, potentially damaging your laptop.
Passive Cooling Enhancements: The Heat Sink Approach
This method focuses on drawing heat away from the laptop through conductive materials. While often less effective than active fan solutions for sustained cooling, it can be a good supplementary approach.
- Materials: Aluminum foil, small copper plates (if you happen to have them), or even an old, flat metal baking sheet.
- How-to:
- Place a layer of aluminum foil or a metal sheet directly beneath the hottest parts of your laptop (usually the bottom center or near the vents).
- Ensure there’s still a gap for airflow around the metal. The metal will absorb heat from the laptop and radiate it into the surrounding air.
- Ice Packs (with Extreme Caution): Some DIY enthusiasts try using ice packs. While they offer fantastic immediate cooling, there’s a significant risk of condensation. The cold surface can cause moisture to form, and if this water gets into your laptop, it can cause severe electrical damage. If you attempt this, always ensure the ice pack is thoroughly insulated and in a sealed bag, and monitor for any moisture. A safer alternative might be a frozen water bottle placed a few inches away, letting the cold air passively circulate.
Materials You Might Already Have Around the House
One of the best things about a homemade laptop cooler is the potential to use materials you’d otherwise discard.
- Structural Components: Cardboard boxes, old plastic containers, unused wooden blocks, LEGOs, sturdy bookends, or even an old cutting board.
- Fans and Wiring: Old USB fans from mini-desktops, defunct computer power supplies (be careful dismantling!), or even small personal fans. USB cables from old chargers.
- Fasteners and Adhesives: Zip ties, strong duct tape, hot glue gun, wood glue.
- Conductive Materials: Aluminum foil, baking sheets, old copper piping (flattened).
Step-by-Step Guide: Building a Basic Fan-Assisted Stand
Let’s put it all together with a practical guide for a common and effective homemade laptop cooler design.
- Gather Your Materials: For this example, let’s assume you have a sturdy piece of cardboard or thin wood (about the size of your laptop), a USB-powered fan (or an old PC fan and a spare USB cable), a few smaller blocks for elevation, and some hot glue or strong tape.
- Design Your Stand for Maximum Airflow: Place your laptop on your main base material. Mark where your laptop’s intake vents are located on the bottom. These are usually near the rear or center.
- Integrate the Fan(s): Cut a hole (or multiple holes for smaller fans) in your base material directly corresponding to the vent markings. The hole should be slightly smaller than the fan’s frame so the fan can rest on the edges. Mount the fan so it pushes air up towards the laptop. Secure it with hot glue, zip ties through pre-drilled holes, or tape.
- Create Elevation: Attach the smaller blocks to the underside corners of your main base material. Aim for at least 1-2 inches of lift. This creates the essential air gap. Ensure these “feet” are stable and won’t wobble.
- Power It Up Safely:
- If using a dedicated USB fan, simply plug it into your laptop or a USB wall adapter.
- If you’ve adapted a PC fan, connect the fan’s red wire to the USB’s red wire (+5V) and the fan’s black wire to the USB’s black wire (Ground). Insulate these connections thoroughly with electrical tape or heat shrink tubing. Test the fan before placing your laptop on it.
- Test and Optimize: Place your laptop on your newly built cooler. Run a demanding application or game and monitor your laptop’s temperatures using a software utility (e.g., HWMonitor, Core Temp). Experiment with fan placement or stand height to find the optimal setup.
Important Considerations Before You DIY
While a homemade laptop cooler can be a great project, it’s crucial to consider a few things.
Safety First: Electrical and Stability Concerns
When working with fans and power, however low voltage, always prioritize safety. Exposed wires can short-circuit and damage your laptop or even pose a minor fire hazard. Ensure all electrical connections are robustly insulated. Additionally, a wobbly stand is a recipe for disaster. Your laptop is an expensive piece of equipment; make sure your homemade solution provides a stable, secure platform.
Performance Expectations: DIY vs. Commercial
A homemade laptop cooler can certainly improve temperatures, often by a noticeable margin (5-15°C depending on the design and laptop). However, it’s important to set realistic expectations. Commercial cooling pads are often engineered with optimized fan layouts, ergonomic designs, and better materials. If your laptop consistently runs extremely hot under heavy load, or if you’re a serious gamer or professional who pushes your machine to its limits, investing in a high-quality commercial cooling pad might eventually be a more robust and reliable solution.
Aesthetics and Portability
Your DIY creation might not win any beauty contests, and its portability might be limited compared to sleek, commercially designed pads. Decide what’s more important to you: ultimate performance, budget, or a polished look and easy transport.
Expert Insight: The Professional Take on Homemade Solutions
“While store-bought coolers offer convenience and specific designs, the ingenuity behind a well-executed homemade laptop cooler, focusing on basic thermal principles like elevated airflow, can genuinely surprise you with its effectiveness,” says Dr. Anya Sharma, Lead Thermal Engineer at Tselk.com. “The key is understanding where your laptop’s heat originates and directing fresh air to those critical zones. A simple stand, when done right, is a powerful first step.”
Maximizing Your Laptop’s Longevity: Beyond the Cooler
A cooler, whether homemade or store-bought, is a fantastic tool, but it’s part of a larger strategy for a healthy laptop.
- Regular Cleaning: Dust is the enemy of cooling. Use compressed air to regularly clear out your laptop’s vents and internal fans.
- Thermal Paste Replacement: After a few years, the thermal paste between your CPU/GPU and their heatsinks can dry out, reducing heat transfer. Replacing it (if you’re comfortable opening your laptop) can significantly improve cooling.
- Software Optimization: Ensure your operating system and drivers are up to date. Close unnecessary background applications, and consider power settings that favor cooler operation when maximum performance isn’t needed.
Frequently Asked Questions
Can a homemade laptop cooler damage my laptop?
A properly constructed homemade laptop cooler that focuses on elevation and directed airflow is unlikely to cause damage. However, poorly insulated electrical connections could short-circuit, and an unstable stand could lead to accidental falls. Always prioritize safety and stability in your design.
What’s the best material for a homemade laptop cooler?
For structural integrity, sturdy cardboard, thin plywood, or dense plastic are excellent choices. For fans, salvaged USB fans or old PC case fans are ideal. The “best” material depends on your desired complexity and available resources.
How much can a homemade cooler improve performance?
You can typically expect a temperature reduction of 5-15°C, which can lead to noticeable improvements in performance by reducing thermal throttling. The exact improvement depends heavily on your laptop model and the effectiveness of your design.
Are ice packs safe for laptop cooling?
Using ice packs directly under a laptop is generally not recommended due to the high risk of condensation. The moisture can seep into your laptop and cause severe electrical damage. If you must use them, ensure they are in multiple sealed bags and frequently check for any moisture.
When should I consider buying a commercial laptop cooler?
If you need guaranteed performance, a sleek and portable design, advanced features like adjustable fan speeds, or if your DIY efforts aren’t sufficient for your heavy workload, a commercial laptop cooler is a worthwhile investment.
Conclusion
Building a homemade laptop cooler is a rewarding project that combines ingenuity with practical benefits. By understanding the basics of thermal dynamics and leveraging common household items, you can create an effective solution to keep your laptop running cooler, extending its lifespan, and boosting its performance. Whether you opt for a simple elevated stand or a fan-powered marvel, the satisfaction of a cooler, more stable laptop engineered by your own hands is truly unmatched. Don’t let your laptop sweat it out – give it the cool comfort it deserves! Try your hand at crafting one, and feel free to share your unique designs and experiences with the Tselk community!
Get our weekly buyer guide
Practical specs, not advice. Unsubscribe anytime.